Some of you will want to start building a generator right away, while others will want to study some of the many interesting things about electricity and magnetism. If you have all of your generator materials, you're ready to go! If you need materials, click here. For a more complete lesson on electricity and magnetism, you might like to check out this webpage first (not yet ready). Click here to start an MPEG video that shows the generator in action. Or click here to see a QuickTime video about Hoover Dam (the picture above) from WWW.Teachers Domain.org that is a segment of a larger video from WGBH Boston Public Television. You must have QuickTime installed to see this video because the video has a "captions on/off" button that we cannot translate to an MPEG file.
Here is our generator. It consists of a pair of magnets on an axle, and a coil of wire wound onto a U-shaped core of iron-like material called Soft Ferrite (click here to learn about Ferrite). The Ferrite core is positioned so that the magnets spin between the legs of the "U". The ends of the wire coil are connected to a small light bulb. You can spin the axle by hand or by winding a string around the spool and giving it a pull.
An Instructor's Note (that kids can read, too!) The simple motor designs that you will find on the web can often be made with the simplest of materials in an assembly that can be so fragile that the slightest mishandling can break it. This is not acceptable in the design for a generator. To obtain a generator voltage output that is usable, the generator armature must be spun rather rapidly, so this structure must be designed so that it can handle some abuse. Further, to obtain sufficient output voltage, whatever coil is used for inducing a current must have many turns, usually several hundred. Therefore, the physical structure for holding the coil must also be able to tolerate the physical manipulation required for the winding of a lot of wire. So this means that a little extra expense in time and materials spent to construct a robust, rigid frame can make a lot of difference in obtaining satisfying results. There are generator designs on the web that rely on the use of heavy cardboard for the basic structure around which a wire coil is wound, or that use a simple nail for the armature that may hold an assembly of spinning magnets. They are a great academic exercise for the experienced adult, but are difficult to assemble for a third or fourth grader. The design we present requires additional work in preparation, but we think that both instructors and students will find the end results much more satisfying.
Assembly
1. Assemble the axle.
Start with the threaded rod and install a nut and washer as in this picture. The washer and nuts that you use are shown at the top. Use the ruler to see how close the nut should be from the end of the threaded rod; leave about 1/4" of threaded rod sticking past the nut on the right. Tighten the nuts onto the axle with a small wrench.
2. Attach magnets to the axle.
Start with two magnets attached end-to-end. Now pull the magnets apart without changing which magnet ends are closest, and place the axle in between the two magnets as shown in the picture. We've put some dots on the magnets to keep track of the ends of the magnets.
3. Finish the armature. The assembly consisting of the magnets and axle is called an armature. Place another washer onto the axle and add another nut. Again, use a pair of small wrenches to tighten the nuts so that the magnets do not fall off.
Finally.add the two 1/4" diameter spacers as in the picture below; the arrows point to the spacers. It helps to add a tiny bit of glue (like Deco cement or hot glue) to the nuts before you screw on the spacers so that the spacers do not come off easily. These spacers will serve as bearings within the wooden frame, so make sure that the outsides of the spacers are smooth and free of glue.
4. Assemble the frame. Start with the frame piece with the two large holes. Add the four 1 1/4" screws as shown in the picture. Put the short end of the axle into the hole in the middle of the frame.
Now slide the four nylon spacers onto the screws.Slide the other frame piece onto the screws and axle. If the armature is too tight and does not turn freely, you might need to use some fine sandpaper to smooth out the center hole in the frames. Now add the nuts onto the four screws and tighten the nuts. Check to see that the armature turns smoothly. 5. Attach the spool. First put a nut and washer onto the axle like this.
| Now add the spool, another washer and a nut. The hole in the spool is too large, so you will need to move the spool from side to side to center the spool on the axle. This way, it will not wobble when you turn the armature. When the spool is centered, tighten the last nut. |
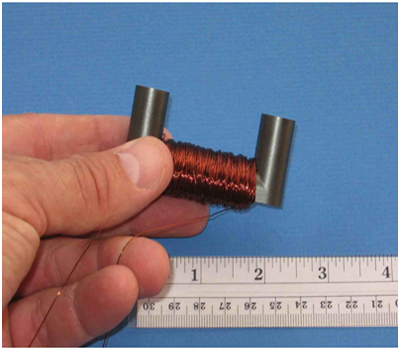
6. Wind the core. You'll want to wind about 800 turns of magnet wire around the base of the U-core (whew!). Don't worry, it doesn't take too long! Be very careful not to drop the core on the floor! Ferrite is brittle (like a ceramic cup) and can break if you drop it. It can be epoxies back together, but then you'd have to wait for the epoxy to cure while everyone else is making their generator, so be careful! Start by taking about 6" of wire from your roll of wire, and wrap it around a leg of the U-core (on the left side above my thumb). This way, it will be available for connection to a light bulb after the winding is finished. Use a piece of tape to secure this end temporarily in place.
Now keep going and wind, wind, wind, wind until you count 800 turns. Wind the wire so that it is forms a layer of uniform thickness, not just a big blob of wire in the middle of the core. When you have finished winding the core, leave an additional 6" of wire remaining at the end of the winding (see the extra wire wrapped around my fingers).Put a piece of tape around the whole winding to keep it from coming apart.7. Assemble the frame and coil. Put the coil into the large holes in the frame. Temporarily put a pair of 1/4" diameter spacers or pieces of dowel under the coil (see the arrows in the picture below). See how there is a little space between the end of the armature shaft and the coil of wire? Ice cream sticks also work as spacers.
Add some hot glue to the ends of the core to hold it in place onto the frame. When the glue has cooled, remove the temporary spacers.
8. Strip off the insulation. The magnet wire is coated with a tough insulation that is like varnish. You will need to scrape off this insulation on the end of the magnet wire so that you can make a good electrical connection to your light bulb. One way to do this is to use a piece of sandpaper. Fold the sandpaper in half and squeeze it around the end of the wire. Pull the wire through the sandpaper. Move the sandpaper around so that you take off the insulation all around the wire. The bare copper will be bright and shiny, so it is easy to tell when the insulation has been removed. Your teacher is probably handy with a pair of scissors and might know another way to scrape off the insulation!
9. Connect the light bulb.
The last task is to connect the light bulb to the coil of wire. Take one bare end of the magnet wire and twist it around one bare end of the light bulb wire. Do this again with the other bare end of the light bulb wire. Make sure that the two bare ends of the light bulb wire are not touching. Then tape the bulb to the side of your generator so that you can easily see the bulb when you operate the generator.
10. Make some electricity! Wind a length of string tightly around the spool. Hold the motor down onto a table with one hand. Make sure that your hand does not interfere with the rotation of the armature with your other hand, pull the string firmly so that the armature spins around quickly. Your light bulb will light as the electric current that you generate passes through the light bulb.
Materials
1. Small bar magnets. Neodymium-Iron-Boron magnets, part number B448, from K&J Magnets $0.82 each in quantities of 10, $0.69 each in quantities of 100.
2. Roll of #30 Magnet Wire, 150 feet. This wire is ordinary copper wire that has been coated with a thin insulating coating made from enamel. The wire is specifically made for winding onto a form, often called a "core". Eventually, we'll need to scrape off some of the insulating coating on the ends of the wire to make electrical connections. Magnet wire (unlike other forms of insulated wire) is sold by weight, not by length. A pound of #30 magnet wire is over 3000 feet and usually the smallest amount of magnet wire that one can purchase as a standard is 1/4 pound, so we have contracted with a supplier to provide spools wound with 200 feet each for individual projects.

3. Ferrite core. The magnet wire is wound around the "U"-shaped Ferrite core (Adams Magnetic Products, Ferro cube UR64/29/14-3C81, Adams part #1000382, @ 2.50 each in small quantities). The magnets will spin between the arms of the "U". Each time the magnets rotate one-half turn, the magnetic field within the "U"-shaped core changes directions. A burst of electric current will be induced in the coil of wire wound around the core each time this happens.

4. Plywood Frame. These are the parts that hold the whole generator together, and require the most work to fabricate. They should be made from a good grade of thin 1/8" plywood. You'll need an electric drill or even a drill press to fabricate these two parts accurately so that all the holes line up. Perhaps someone in your school district has a wood shop where these parts can be fabricated. It is pretty important to do a good job of making these parts to make sure that the magnets spin freely and securely between the sides of the frame. If the two plywood sheets are first cut to size, and then are taped securely together, the holes may be drilled through both sheets simultaneously. This reduces alignment problems.
One way to make the frame is to tape this layout to your pieces of plywood, and use it to accurately position your drill. When you print the form, you'll need to make sure that your printer has properly scaled the size of the pattern. Simply measure the pattern and compare the actual size with the printed dimensions.

5. Small light bulb. When the generator armature is spun quickly, the generator will produce an output of several volts. But small hands may have a hard time getting lots of speed, so we've selected a small incandescent bulb that requires only 1.5 volts. Also, we'll need a bulb that does not require too much current. Some theory for you accomplished electrical types: we don't want a bulb with a resistance less than the electrical resistance of the coil of wire wound around the U-shaped ferrite core, which will be about 10 ohms. Therefore, we would like a light bulb that will illuminate brightly with a current much less than 1.5 volts / 10 ohms = 0.15 Amps. A very nice choice for the bulb is the Radio Shack #272-1139, rated at 1.5 volts / 0.025 Amps, at about $1.29. Another excellent bulb is the Miniatronics #10-001-10 rated at 1.5 volts/0.015 Amps, at about $1.08 each per 10 pieces.
A less-expensive alternative is to use a typical light-emitting-diode, such as Dig key #*******. However, I find these very unsatisfying as a demonstration of the generation of electrical power. When a 4th graders asks "Why does the LED light up?", are you going to tell them that "the electric field produced by the generator forces an electron from the N-type material, across the P-N junction, into the P-type material where it recombines with a hole, emitting the band-gap energy as a photon" or when the 4th grader asks "Why does the light bulb light up?", will you simply say that "The electrons passing through the thin wire in the light bulb bumps into the atoms and makes the wire so hot that it glows."
6. Pile of Mechanical Parts
Here are the remaining mechanical parts needed to complete the assembly. We suggest purchasing these parts in multiples of 10 sets so as to dramatically reduce the cost per student. We have selected parts fabricated to the American system of units (inches), rather than metric parts, since well-stocked hardware stores in the US will have these components.
3" length of #6-32 threaded rod.
10 each #6-32 steel nuts.
4 each 3/4" diameter fender washers.
4 each #6 x 5/8" nylon spacers.
4 each #6-32 x 1 1/4" stainless steel machine screws.
2 each 1/4" diameter by 1/4" length aluminum spacers, #6-32 inside thread.
3/4" dia. wooden spoon.
3 feet of string.
Tools for the actual assembly:
5/16" wrench (for the nuts)
screwdriver
1/2" masking tape
hot glue gun